
Discover the ideal method to record your screen with audio on Windows 10 using a top-notch free screen recorder. Preserve exceptional quality while capturing your screen on a Windows 10 PC.
What are the benefits of recording your screen in Windows 10? Undoubtedly, capturing on-screen activities provides the simplest way to create a wide range of videos. Educators can produce lecture presentations for remote learning, software developers can make tutorial videos demonstrating program usage, gamers can capture game clips to share on social media platforms, and individuals can record online meetings, webinars, streaming videos and audios, as well as live streams for future viewing.
What is the process of screen recording on Windows 10? The screen recorder on Windows 10 provides a convenient method for capturing all activities on your computer, enabling you to create high-quality screen recordings with audio. In this article, we will guide you on how to record your screen with audio in Windows 10 using free and reliable screen recording software.

How to utilize the built-in screen recorder for Windows 10 in order to record your screen.
Indeed, some individuals are unaware that Windows 10 has a built-in screen recorder known as Xbox Game Bar. While its primary focus is on gamers, it serves as a convenient and functional screen recording tool for most applications. Let’s explore how to locate this native screen capture feature and use it to record your screen on Windows 10.
To begin, you must enable and access Xbox Game Bar
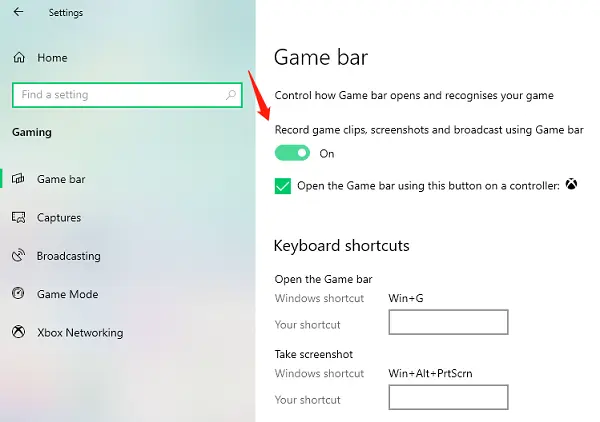
Step 1: Click the Start button located at the bottom left corner, and then select the Gear icon to open the Settings menu.
Step 2: In the Settings menu, choose Gaming. By default, the Xbox Game Bar section will load. On the right-hand side, you will find a toggle switch to enable or disable the bar. If the toggle switch indicates “Off,” simply click on it to activate the video capture tool. Once enabled, you can begin recording your screen on Windows 10.
How to utilize Xbox Game Bar for screen recording on Windows 10?
While the Xbox Game Bar screen recorder can function with regular apps, it does have certain limitations. Not all actions performed on Windows 10 can be captured by this tool. Desktop and File Explorer, for example, cannot be recorded. Therefore, before proceeding, ensure that you open the specific app you wish to record. Failure to do so may result in a notification stating that gaming features are unavailable for the Windows desktop or File Explorer. With that in mind, follow these steps to instantly record your screen on Windows 10.
Step 1: Press the Windows Key + G shortcut to open the pre-installed screen recorder on Windows 10, the Xbox Game Bar.
Step 2: Click the “Start Recording” button (or use the Windows Key + Alt + R shortcut) to begin recording your screen in Windows 10. You can customize the default settings by clicking the “Settings” button, which allows you to choose whether to record audio or not.
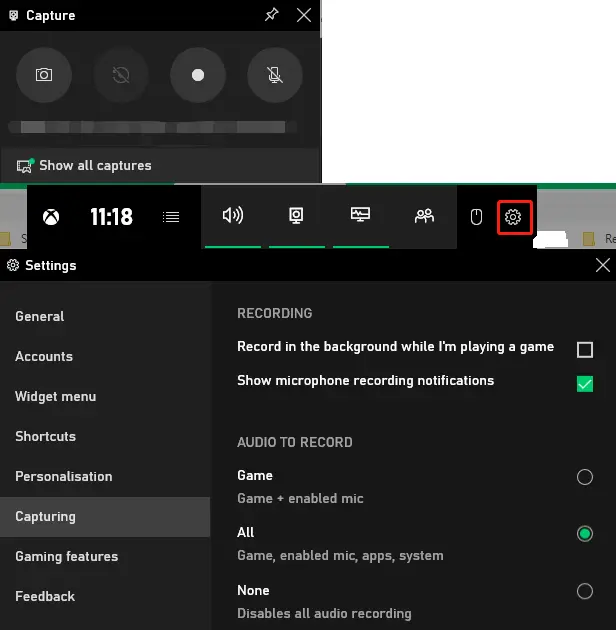
Step 3: Located at the top right corner of your computer screen, you will find the Capture Status displaying the recording time. To stop the recording, simply click the green button.

To access your recorded videos, press the Windows Key + G to open the tool. Click on the Widget Menu and select Gallery. In the Gallery, you will find all the videos you have recorded, saved as MP4 files. Another method to locate your recorded videos in Windows 10 is by navigating to the Captures subfolder within the Videos folder.
However, it’s important to note the limitations of the built-in screen recorder for Windows 10
- It cannot record the entire screen or specify a resolution for capturing.
- There is no option to pause the recording during the process.
- The video editing features are limited.
- At times, the gaming features may not be available for the Windows desktop.
How to Capture Your Screen on Windows 10 using a Third-Party Screen Recorder.
When the Xbox Game Bar falls short of your expectations, third-party software emerges as the optimal solution for screen recording on Windows 10. iTop Screen Recorder is an effortless, free, and robust screen recording tool designed for both Windows 10 and the latest Windows 11. It empowers you to capture every activity on your Windows screen, ranging from mouse clicks and keyboard inputs to video and audio playback. With iTop Screen Recorder, you can effortlessly record applications, web browsers, and any specific area on your screen with ease.
iTop Screen Recorder offers a variety of options to cater to diverse screen recording needs on Windows 10. Additionally, it includes supplementary video processing tools such as a video editor and compressor, allowing you to enhance your recordings for later viewing or sharing.
- Capture any area on your Windows 10 screen effortlessly. iTop Screen Recorder provides flexible screen capturing capabilities, giving you the freedom to choose between recording a selected region, the full screen, a specific window, or an area with a fixed aspect ratio (4:3 or 16:9).
- Record your Windows 10 screen with audio and webcam. This screen recording mode allows you to simultaneously capture both the screen and audio, including system audio, built-in camera, external microphone, and external webcam. This feature proves invaluable in creating efficient how-to videos, training videos, explainer videos, and more.
- Achieve high-quality screen recordings on Windows 10 without any lag. iTop Screen Recorder enables you to customize the video quality, offering options such as 720p, 1080p, 4k, and 60fps. The software utilizes hardware acceleration to ensure a smooth recording experience, allowing you to capture HD videos without any stuttering or other issues.
- Record everything happening on your Windows 10 screen. iTop Screen Recorder precisely captures the content displayed on your screen, making it ideal for recording Zoom meetings, online webinars, gameplay sessions, video calls, and streaming videos or audios, all without any loss in quality.
With its user-friendly interface, iTop Screen Recorder is an easy-to-use program suitable for beginners. You can effortlessly initiate your screen recording in just a few clicks.
How to Record Your Screen in Windows 10 using iTop Screen Recorder
Step 1: Begin by downloading and installing iTop Screen Recorder for Windows 10. This software is also compatible with Windows 11, 8, and 7.
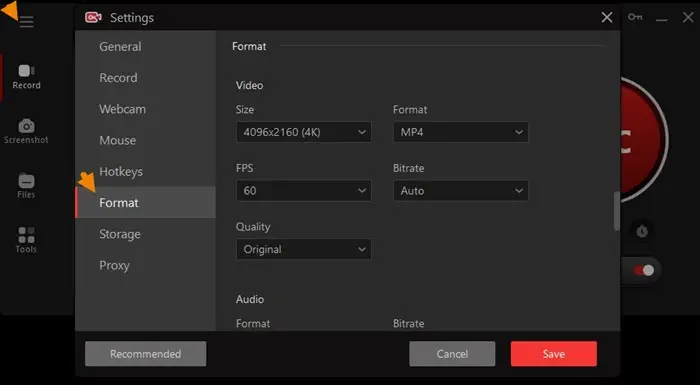
Step 2: Configure Preferences
Open iTop Screen Recorder and navigate to the Settings menu. Here, you can customize your preferences according to your needs. For instance, if you wish to modify video parameters, click on Format > Video. In this section, you can adjust the size (resolution), format, frame rate, bit rate, and quality settings as per your requirements.
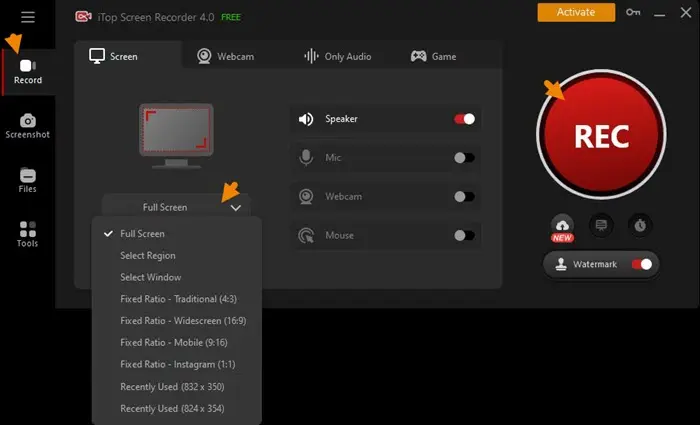
Step 3: Begin Recording Your Windows 10 Screen
- On the Record tab, click the drop-down arrow to choose your desired recording area.
- If you wish to record the screen with system audio, enable the “Speaker only” option.
- To record your screen along with your voice and yourself using the webcam, enable the “Mic and Webcam” option.
- If you want to capture mouse clicks, enable the “Mouse” option and click on the gear icon to configure any desired effects.
- Finally, click the “REC” button to initiate the screen recording process.
Step 4: Stop Recording in Windows 10
Once you begin recording, a mini control bar will appear.
On this bar, click the pen icon to open the doodle panel. From there, you can use arrows, shapes, and text to highlight content or add annotations while recording.
To conclude the recording, click the red square-shaped “Done” button.

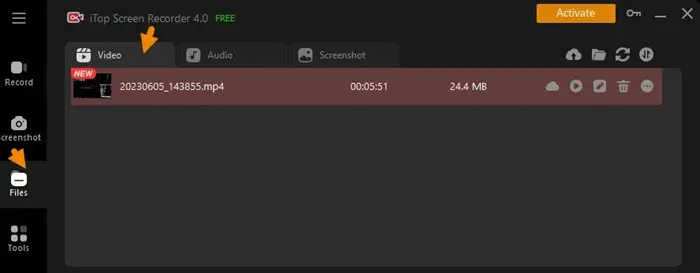
Your recording file will be automatically saved in the “Files > Video” folder. To access additional editing options, click the “Edit” button, which will launch the video editor. Here, you can perform tasks such as cutting, resizing, rotating, and adding text, images, and effects to your recording.
Furthermore, you have the ability to play, rename, delete, or directly upload the recording to social media platforms.
How to Record Your Screen in Windows 10 using Microsoft PowerPoint
Microsoft PowerPoint not only serves as a presentation maker but also contains a hidden recording feature that can be used as a screen recorder for Windows 10. If you simply wish to capture your screen with audio and mouse movements, PowerPoint can be a convenient tool. Let’s explore how to record your Windows 10 screen using PowerPoint.
Step 1: Begin by creating a new slide in PowerPoint. To access the “Screen Recording” feature, navigate to the “Insert” tab and choose it from the available options.

Step 2: Select the Recording Area
Next, you have two options to choose from: either click on “Select Area” or use the keyboard shortcut Windows logo key + Shift + A. Once selected, drag the cursor to define the specific area of the screen that you want to record.
Step 3: Begin Recording
To commence the recording, click on “Record” or use the keyboard shortcut Windows logo key + Shift + R. When you are ready to conclude the recording, click on “Stop” or use the keyboard shortcut Windows logo key + Shift + Q.
Tips: Microsoft PowerPoint will automatically record the screen along with audio and the mouse pointer in Windows 10. If you prefer to record the screen without sound, simply disable the audio option before initiating the recording.

Step 4: Save the Recording
After completing the recording, the captured video will be automatically inserted into the slide. To save it as a separate file, right-click on the video frame and select “Save Media.” Select the desired folder to save the file, assign it a name, and then click the “Save” button.
Conclusion
iTop Screen Recorder is an exceptional screen recording software that provides a multitude of features and capabilities for users on Windows operating systems. With its user-friendly interface and powerful functionalities, iTop Screen Recorder stands out as an excellent choice for capturing high-quality screen recordings.
The software offers flexible recording options, allowing users to select specific areas of the screen, record audio from multiple sources, and capture webcam footage simultaneously. iTop Screen Recorder also supports various video formats and resolutions, enabling users to tailor their recordings to meet their specific needs.
Additionally, iTop Screen Recorder goes beyond basic screen recording by providing additional tools for video editing, such as cutting, resizing, rotating, and adding text or effects. This allows users to enhance their recordings and create professional-looking videos.
Furthermore, iTop Screen Recorder ensures a smooth and lag-free recording experience, utilizing hardware acceleration to deliver high-quality videos without any performance issues.
Overall, iTop Screen Recorder is a reliable and feature-rich solution for anyone looking to record their screen on Windows. Its ease of use, comprehensive features, and impressive recording capabilities make it an excellent choice for various purposes, including creating tutorials, capturing gameplay, conducting online meetings, and more.
Wow, fantastic weblog layout! How long have you been blogging for?
you made blogging glance easy. The total look of
your site is wonderful, let alone the content!
You can see similar: sklep internetowy and here najlepszy sklep